Using patterns in Inkscape

December 12, 2013

This is a tutorial on how to use patterns (such as seamless patterns, elements, or digi papers) in Inkscape. I’m using Inkscape 0.47 due to compatibility issues with some cutting programs and the newest version of Inkscape.

IHM Inkscape pattern tutorial

  1. Open Inkscape and create a document that is the same size as your paper you will be printing on. I want to print strips to make paper tapes, so I made a rectangle that is 1.5×11 inches (I’m printing on US letter size paper and will run the strips through a 1.5 inch Xyron then cut the strips into smaller widths).
    IHM Inkscape pattern1
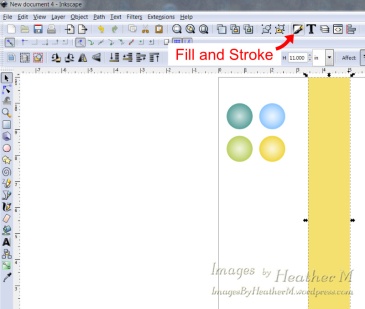
  2. Create or import a pattern into your document. In this example I used four circles with gradients and a white background square. Digi-papers or seamless patterns also work very well.
    IHM Inkscape pattern2
  3. With your pattern selected use Object/Pattern/Objects to pattern.
    IHM Inkscape pattern3
  4. Click on the Fill and Stroke icon to bring up that window.
    IHM Inkscape pattern4
  5. With your shape to be filled selected, click on the Pattern button.
    IHM Inkscape pattern5
  6. If you have created multiple patterns in your document you will need to use the drop down box to select your new pattern fill. The newest pattern will be on the bottom of the upper section.  Unfortunately they are given numbers by Inkscape and I don’t know of any way to change it to something else.
    IHM Inkscape pattern6
  7. The pattern fill can be adjusted using the Node tool. Select your filled shape and then select the Node tool.
    IHM Inkscape pattern7
  8. The X on the pattern will adjust the position of the fill, the circle adjusts the rotation, and the small box will adjust the scale. Hold down the Control key to constrain the proportions or angle.
    IHM Inkscape pattern8
  9. Here are two strips that I made. The one on the left was made using a digi-paper and the one on the right was made with my vector pattern.  I would fill my page with either strips or digi paper before printing.
    IHM Inkscape pattern9

Inkscape has a bug that can result in white lines through shapes filled with patterns.  If you have a main color other than white you can put a duplicate shape filled with the main color behind the shape with the pattern fill.


Did you know for eCAL and SCAL3 and WOYWW

November 14, 2012

Did you know that SCAL3 and eCAL can now import images that are embedded in SVG files?  It makes print and cut so much simpler since you can have it all in one svg file with the correct alignment of image with cutting lines.  If you are creating your own svg file, first bring your image into Inkscape using  open, import, or paste.  Then simply click on your image and from the menu select Extensions/Images/Embed images.  A pop-up window will appear.  I leave “Embed only selected images” checked and then click “Apply”.  Your image is now embedded in the svg file and you can close the Embedded Images box.   These steps are for Inkscape 0.47.  If I remember correctly, Inkscape 0.48 can automatically embed pasted pics.  So if you are using Ink48 it might not be necessary to do this or the steps might be different.

Also, Craft Edge just announced today that there are plug-ins for SCAL3 and eCAL to cut directly from Illustrator and Inkscape.  I haven’t tried it yet, but if it works well it will save a step or two when cutting.  The plug-ins are available here.

I missed What’s on Your Workdesk? Wednesday again last week, but I’m back on track this week (I hope).  Here’s my messy table.  I really, really need to clean it up.  My goal at this point is to clean it all up and find places for all of the odds and ends that are currently living on my table.  My current project is a LO of my DD and my cousin’s daughter at the campground.  I’m not happy with the current arrangement but I think some flowers and butterflies will help it out.     :)


The Font Thing and Windows 7 64 bit

April 16, 2010

I just switched from XP to Windows 7 64 bit, and discovered that my usual method of opening uninstalled fonts to use in Inkscape doesn’t work with Win7.  When I tried to install The Font Thing I got an error message and it wouldn’t install.  What is a font addict to do?  I found this solution and it works!  Go to The Font Thing website  here and then click on the Download tab.  Download the second link on the download page.  You want the one without the installer since you aren’t going to install the program.  Once you have the files downloaded, unzip them, then for ease of use I pinned the TFT.exe to the taskbar.  Just click on the pinned file to run the program.

When you click on the Browse tab, you might just get a question mark.  If you click on the refresh button it will change to your C drive and you can navigate to where  you have your uninstalled fonts stored.  Then you can preview or temporarily load your uninstalled fonts.  🙂  If you want to use TFT to install fonts, you will have to set it to run as an administrator before you open the program.


Inkscape Path operations explained – Part 2

January 18, 2010

This is the second half of the Inkscape Path operations.   I will discuss #1-6 in the image below.  See this post for the other Path operations.  Objects don’t need to be converted to Path before Inset, Outset, or Offset operations, but will automatically be converted during Inset and Outset (but not Offset).

  1. Inset.  This will inset or make thinner the selected objects.  This will be done at a fixed amount.  Repeat as needed for the desired look.
  2. Outset.  This will outset or make larger the selected objects.  This one will also be done at a fixed amount, but can be repeated for the desired look.
  3. Dynamic Offset.  This is similar to inset and outset, except the amount is controlled by how much the handle is moved.  Also, the handle  can be moved in or out for an inset or outset.  This tends to round corners more than Outset.  You must convert this to Path for cutting.  See this tutorial at Cutting Time for more information on Dynamic Offset.
  4. Linked Offset.  This is like Dynamic Offset, except it creates a duplicate of the original Object.  The original object is not changed and a new object is created.  Very useful for creating mats behind words or multi-piece artwork since you can edit the original artwork and the Linked Offset will change with it.  Changing the original object with an active Linked Offset can be a little more demanding on your computer’s resources if you are using an older computer.  The Linked Offset needs to be converted to Path for cutting.   If the original was unconverted text, that will also need to be converted to Path for cutting.  I changed the color of the linked offset in the image below for visibility.
  5. Simplify.  This will reduce the amount of nodes in a vector.  It tends to distort corners, so use with caution.  If you are creating artwork from separate pieces that form corners, helps to combine the pieces, simplify, then Path/Union.  Each time simplification (Control L) is repeated within 0.5 seconds, the simplification gets more aggressive.  Also, the more nodes present, the more aggressive the simplification will be.  The severity of simplification can be adjusted using the Inkscape Preferences (from the File menu).
  6. Reverse.  This reverses the direction of the Path.  Useful for Text on Path or Pattern on Path to change the direction of the text or pattern.